It’s paperless!
Well, if you happen to be one of those who love a neat desktop or the environment, then you could have a go at trying virtual sticky notes.
These are software applications that allow you to put a note on your display just as you would a Word document or presentation---no paper, no gum, and you can get rid of them by just hitting the ‘delete’ button.
There are a number of options (paid and free) available, but one of the most popular is Zhorn Software’s Stickies. It is a mere 950 KB download (from http:// http://%20www.zhornsoftware.co.u%20k/stickies/download.html ), installs smoothly on all versions of Windows, and is free.
Once installed, Stickies parks itself in the QuickLaunch bar. If you want to put a new Stickie, just double click on the Stickies icon and start typing your message on the Sticky that pops up. If you want to look at older ones or tweak configurations, go for a right click.
You can have all kinds of fonts and skins from the traditional yellow to shocking pink, if such is your inclination. Also tweak able is just how opaque you want the Stickies to be and whether you want them to always be visible or disappear the moment you click outside them.
And of course, unlike traditional sticky notes which restrict you to a pitiful scrap of paper, here you can make the Sticky as large as you wish!
It's more than just sticky business
These Stickies also do stuff that the normal paper ones cannot. For instance, you can tag them to a particular document or file, so that they show up only when that particular document of file is opened. You can also send them across to other people over the local area network or by using email.
You can even use them as alarms, asking them to pop up at a certain time say, as a reminder for an appointment. You can even transfer Stickies to handheld devices, provided they run Pocket PC and Palm OS. What’s more, Stickies is supposed to be a relatively safe piece of software.
Wednesday, April 23, 2008
Tuesday, April 8, 2008
Importing old email to Gmail.
Got a new Gmail ID? But wondering how you can transfer your old mails from your other accounts to it?
Here are a few tips by which you can actually make it happen.
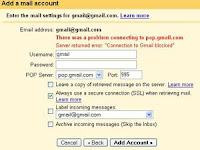
First, you need to tell Gmail how to retrieve your mail from old accounts using POP. For this you need to set up a Mail Fetcher.
* Click Settings from the top of any email page.
* Click Accounts.
* In the Get mail from other accounts section, click Add another mail account.
* Enter the full email address of the account you'd like to access, then click
* Google will populate the Username and POP Server fields when possible, based on your email address. Enter your Password.
Now decide whether to:
* Leave a copy of retrieved messages on the server
* Label incoming messages
* Archive incoming messages
If you'd like to keep a copy of each message Gmail retrieves in your other mail accounts, select the Leave a copy of retrieved messages on the server checkbox. This way, you can access mail in your other accounts, and in Gmail.
Please note that some email services may still delete your messages when Gmail fetches them. If this option is checked, Gmail will instruct the other domain to leave the messages in place, though the final behavior is up to the other domain. If you'd rather delete copies of messages that Gmail retrieves, leave this option unchecked. Gmail will delete the messages from the other account as those messages are retrieved, meaning you'll only be able to read them in Gmail.
Make sure that you always use a secure connection (SSL) when retrieving mail. If the email account being retrieved from supports Secure Sockets Layer (SSL) encryption, you can select this option to have all information sent through a secured connection. If you select this option, and your email provider doesn't support it, Gmail will let you know that your configuration failed.
Clicking Show error details will likely reveal a Protocol error in this case. You'll need to uncheck this selection before continuing.
 If you'd like to automatically label all messages that are retrieved from your non-Google account, select this option.
You can choose to use the predefined label (your email address), or you can select an existing label or create a new one from the drop-down list.
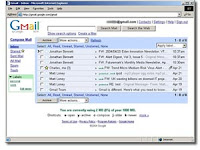
Archiving moves messages out of your inbox and into All Mail, letting you tidy up your inbox without deleting anything.
Messages you archive can be found in All Mail, in any labels you've applied, and by searching Gmail. When someone responds to a message you've archived, the conversation containing that message will reappear in your inbox.
Here's how you can archive messages:
* Select a message by checking the box next to the sender's name.
* Click Archive.
* If you have a conversation open, you can archive it by clicking Archive at the top of the page.
To move mail back to your inbox:
* Click All Mail.
* Check the box next to the sender's name.
* Click Move to Inbox.
Go to Settings > Accounts > Get mail from other accounts > Add another mail account.
A new window will pop-up asking you for the email address you're going to import mail from. Fill this in and click on "Next Step." It is useful to label incoming messages with "Imported" (use any thoughtful label you can think of), so that you could easily identify imported mail later on.
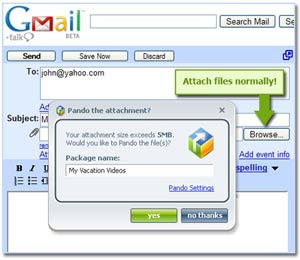
If you would still like to have the option of sending mail from Gmail that appears to recipients as if it were sent from your old email address, you can set up a custom "From:" by going to Settings > Accounts > Send mail as: > Add another email address.
Click on "Next Step" and then "Send Verification."
You'll receive an email with instructions on how to validate your old address. Once it is set up you can select this address in the "From" field when replying or forwarding.
Then, validate with "Add Account" and finally, select "Yes, I want to be able to send mail as yourname@gmail.com."
Courtesy: Google
Here are a few tips by which you can actually make it happen.
First, you need to tell Gmail how to retrieve your mail from old accounts using POP. For this you need to set up a Mail Fetcher.
* Click Settings from the top of any email page.
* Click Accounts.
* In the Get mail from other accounts section, click Add another mail account.
* Enter the full email address of the account you'd like to access, then click
* Google will populate the Username and POP Server fields when possible, based on your email address. Enter your Password.
Now decide whether to:
* Leave a copy of retrieved messages on the server
* Label incoming messages
* Archive incoming messages
If you'd like to keep a copy of each message Gmail retrieves in your other mail accounts, select the Leave a copy of retrieved messages on the server checkbox. This way, you can access mail in your other accounts, and in Gmail.
Please note that some email services may still delete your messages when Gmail fetches them. If this option is checked, Gmail will instruct the other domain to leave the messages in place, though the final behavior is up to the other domain. If you'd rather delete copies of messages that Gmail retrieves, leave this option unchecked. Gmail will delete the messages from the other account as those messages are retrieved, meaning you'll only be able to read them in Gmail.
Make sure that you always use a secure connection (SSL) when retrieving mail. If the email account being retrieved from supports Secure Sockets Layer (SSL) encryption, you can select this option to have all information sent through a secured connection. If you select this option, and your email provider doesn't support it, Gmail will let you know that your configuration failed.
Clicking Show error details will likely reveal a Protocol error in this case. You'll need to uncheck this selection before continuing.
 If you'd like to automatically label all messages that are retrieved from your non-Google account, select this option.
You can choose to use the predefined label (your email address), or you can select an existing label or create a new one from the drop-down list.
Archiving moves messages out of your inbox and into All Mail, letting you tidy up your inbox without deleting anything.
Messages you archive can be found in All Mail, in any labels you've applied, and by searching Gmail. When someone responds to a message you've archived, the conversation containing that message will reappear in your inbox.
Here's how you can archive messages:
* Select a message by checking the box next to the sender's name.
* Click Archive.
* If you have a conversation open, you can archive it by clicking Archive at the top of the page.

To move mail back to your inbox:
* Click All Mail.
* Check the box next to the sender's name.
* Click Move to Inbox.

Go to Settings > Accounts > Get mail from other accounts > Add another mail account.
A new window will pop-up asking you for the email address you're going to import mail from. Fill this in and click on "Next Step." It is useful to label incoming messages with "Imported" (use any thoughtful label you can think of), so that you could easily identify imported mail later on.

If you would still like to have the option of sending mail from Gmail that appears to recipients as if it were sent from your old email address, you can set up a custom "From:" by going to Settings > Accounts > Send mail as: > Add another email address.
Click on "Next Step" and then "Send Verification."
You'll receive an email with instructions on how to validate your old address. Once it is set up you can select this address in the "From" field when replying or forwarding.
Then, validate with "Add Account" and finally, select "Yes, I want to be able to send mail as yourname@gmail.com."
Courtesy: Google
Tuesday, April 1, 2008
Detect Heap Corruption -- Using CrtCheckMemory()
To debug code that caused heap corruption,We normally do struggle against the computer in order to understand what causes the corruption and how.
In the search for memory validation APIs I have found _CrtCheckMemory() API which is being used by debug version of C run-time libraries. Using this API wrapped with an assert macro gives us the opportunity to check the heap every few lines of code without any overhead in release version: _ASSERTE( CrtCheckMemory());
it would be smart idea to use it even without any visible corruption, it saves time in the long run . This tip is based on information written on the MSDN.
Subscribe to:
Posts (Atom)